Red Pattern

Monday, September 24, 2012

Showing Some Love to My Shower Hostesses

It's been a little while since I shared with you guys the pictures from my bridal shower. Some of you may remember it was at a cozy bed and breakfast, and it was hosted by one of Momma Coach's closest friends, and Aunt Coach. These two ladies were so generous to plan such a beautiful day for me, and I really wanted to give them something special in return.

My shower hostesses: Aunt Coach and Momma Coach's friend, L
(As well as Little Cousin Coach, who got her own unique gift
!)
At first, I had a hard time deciding what to give these special ladies. I considered getting a nice floral arrangement for each of them, or maybe even a spa gift certificate (although I quickly decided that wasn't going to be very budget friendly). I started browsing the 'Bee to see what the brilliant ladies before me had come up with, and stumbled upon a wonderful idea by our own Mrs. Latte from a few years back.

Basically, she took a few simple items - a bar of soap, freshly baked cookies, and tealight candles - and turned them into a fun and unique gift for her hostesses. I loved the idea so much (and thought the ladies would too) that I decided to do the same!

I wanted to find some yummy handmade soap, so I headed over to Etsy and bought a couple of these Shea Butter Soap Bars from Anderson Soap Company.  I was a little pressed for time (what is with me and waiting until the last minute for items for the shower??) but Dennis, the owner, was quick to respond to my message and told me he could send the bars out right away, so props to Anderson Soap Company for a quick soap delivery! :)

Image via Anderson Soap Company on Etsy
For the candles, I decided to head over to Ikea (having one so close is both a blessing and a curse) and grab a few of their reasonably priced options. I found these pretty and inexpensive candles in nice glass jars that I thought would look great next to the soap bars.

Image via Ikea
Once I had all of the "parts" of the gift, I had to put it together. I used scrapbook paper and twine that I already had to make tags for the candle and soap, and stuffed boxes filled with wood filler (both from the Container Store) for a nice little presentation.

The outside of their gift, just waiting to be opened!
The inside of the gift, complete with a fancy soap bar and yummy smelling candle!
The cute tags were my favorite part of Mrs. Latte's gift, so I followed in her footsteps and made tags that read: Thank you, "for lighting up my day" for the candle and "for showering me with gifts" for the soap. Too cute! I just used a hole punch to make a hole in the tags and attached them to the items with pieces of twine. (I opted not to include cookies in my gift like she did because I was traveling to the shower and had no way to bake them and keep them fresh!)

I really love how it all came together, and think the lovely hostesses did as well. It was a simple gift, but also very practical. Hopefully they thought it was as unique as I did!

For those wondering, here is a little budget breakdown for these gifts:
(2) White Container Store boxes - $1.49 each
(1) bag of shredded wood filler (which I still have over half of) - $3.99
(1) Roll of Satin Ribbon - $2.49
(2) Soap Bars - $3.50 each
(2) Glass jar candles - $3.99 each
Scrapbook paper - free, already owned
Twine - free, already owned
Total: $26.46, with tax OR $13.23 per gift

Not too bad in my book! What did you all give your shower hostesses? Did anyone choose to make their own gift?


Monday, September 17, 2012

Some Sparkle for My Shoes


I'm really not sure what I would do without you guys. Once again, y'all have helped me make a tough decision, and I am so, so happy that I listened to all of you!

The tough decision I'm referring to is one that many of you will remember - what to do with my red shoes? I first showed you all the shoes here, and then after making the decision to stick with the red option, I presented you guys with the dilemma of which shoe chips to choose. There was an overwhelming response favoring the bling! I should've known - y'all are such a sparkling group :)

Many of you liked this shiny pair of clips from Big Rock Bridal:

image via Big Rock Bridal on Etsy
While others were fans of the fun bow clips from Kirsten Kuehn:

image via Kirsten Kuehn Designs on Etsy
And, I have to say, I was loving the bows as well! After hearing from all of you, I headed over to Kirsten's website to check out those lovelies. While looking for the clips pictured above, I discovered all of the other fun options she offers.

Look at all of those choices! / Image via ShopKirstenKuehnDesigns.com
It was a tough decision to make, but I ended up choosing the Carrie shoe clips because I looove Sex & the City because they're a little bolder and have a little more character.


I mentioned here that I do tend to worry a bit when I order items online, so when the clips arrived in the mail recently I was nervous to try them out. However, I can say that these beauties were one of the best wedding purchases I have made! They're just fabulous - beautiful, great quality (I was worried about how the clip would attach to the shoe) and I just love them.


I think they really spice up my red shoe without looking like they don't match or were an afterthought (even though they were :) ) and they are such a great size. 


I had assumed I would put the bows on the front of the shoe just the way the pictures shows, (and I will probably end up doing so) but I had such a great time playing around with the different options, and I think they really could all work!


Has anyone else made a recent upgrade to their wedding wardrobe? Any other Kirsten Kuehn Designs lovers? I maaaay just have to get one of those gorgeous bouquet wraps.

Wednesday, September 12, 2012

Tote Bags for the Bridesmaids

I've always been a little skeptical when it comes to buying items online. Factors like quality of the product and the unknown delivery time really make me worry. During college, I started buying textbooks online (instead of paying the unbelievable amount the bookstore wanted) and this helped my fears a little, but now that I am in full on wedding planning mode, I can't imagine not shopping online. Not having access to the world of Etsy would have completely denied me of so many wedding details, and I couldn't have had important parts of our big day, like the invitations, if it weren't for online shops like Minted. So, I've put most of my fears aside and I have no problem making those online purchases any more! My bank account is not happy about this, but I sure am - especially when I get to show you guys a fun purchase like the one I just recently made.

I really wanted to get a fun bag/tote/purse to give to my bridesmaids to use during the wedding. I know you guys are no strangers to bridesmaid totes around here - Miss Lyre DIY'ed her own chevron totes, and Miss Hawk did some awesome monograms, but while I'm working on numerous other projects, I decided to search the web for a pre-made option that I couldn't live without :)

Options on Etsy were abundant, but also a little pricey for my liking. I kept looking back at these chevron options because they were so fun, but for the size and lack of personalization I thought the price was a little much.

Small Chevron totes via OohBabyInfinity on Etsy
I've always thought the jute monogrammed bags from Ballard Designs look so nice, but again, too pricey to be buying for a group! Not to mention I really liked the white, and it was on backorder. *sigh*
Tote Bags from Ballard Designs
Finally, I ended up at Wedding Chicks shop, and starting searching through their many options of $10 totes. The price was certainly right, I just wasn't sure about finding the right design. I really liked bags that had both "bridesmaid" and the name on them, rather than just one or the other (I know, I know, obsessive much?) and of course the option that I liked (Rosy) at Wedding Chicks was not a $10 tote, but a $26 one. Fail. However, (yes there is an ending in sight) I actually fell in love with another very simple design, the Lavish Bridal Party tote. I ordered them - much more willingly than a Miss Coach just a few years ago would've done - and they have arrived!


Of course, I was a little unsure what the quality would be like having never purchased from their shop before, but I am really happy with how they turned out! They are a little bigger than I was expecting, good quality for wedding day use and the printing looks great. They have a lot of color options (I'm boring and chose black) that could match and bridal party's colors and also have matching Mother of the Bride/Groom bags to match which I thought were fun. I got Momma C a bag as well, but didn't put it in the pictures - let's see how closely she reads my posts ;)


I'm planning to fill the bags with all kinds of wedding day goodies, including the girls' getting ready attire (more on that soon, but here's my inspiration post) and some "just in case" things they might need. I'm also thinking about personalizing them just a little more. I'd really like to have the girls' names on their bags, maybe with a fun tag or pin attached? Either could be DIY'ed super easy! I'm also thinking about dressing them up a little more, maybe with a fun faux flower attached in red to match their dresses?

Personalized Name Tags via DreamState on Etsy
Here's where I would love some help from you guys - what did you put in bags to give to your bridesmaids? Anything you didn't include that you wish you would've?


Monday, September 10, 2012

The Coach Invitations, Revealed!

The invitations have been sent out and responses are starting to flow in, and I know y'all know what that means: it's time to show off our invitation suite! I really love invitation reveals here on the 'Bee. I just think it's so fun to see everyone's wedding planning really coming together and get a glimpse at such an important part of their wedding!

Some of you might remember, but for those who have shown up since then or need a refresher, Mr. C and I really wanted something romantic and classic, without looking too traditional, read: Boring. I loved a lot of the options that Minted had, and after having such a great experience with our save the dates, and the way I raved about them, some of you probably guessed that we would find our perfect invitation there - and you would be right! So, enough chit chat - here is a little look at what the Coach wedding guests have been receiving in their mail boxes the last week! (I used the sample invitation that we had received from Minted instead of having to blur all the pretty details from our actual invite.)


I really wanted to use ribbon as a belly band of sorts, and finally decided on this thin, red ribbon to tie things together. The smaller bow still laid fairly flat inside the envelope, so I didn't have to worry about tearing or things getting too messed up in transit.


The calligraphy on the envelope is one of my favorite parts of the whole ensemble. The beautiful writing was done by Rachel Carl and I couldn't be happier with how it turned out. I hate that I have to blur it out, but the return address on the back was such a fun detail too.


One of my other favorite parts was our fun little return address stamp. I also ordered this from Rachel, and I may have to get some more of these in the future because they just make putting your address on things so fun! For the sake of not having to blur, this is the sample of the style we chose from her website:

Image via Rachel Carl Co. on Etsy
I reaaaally didn't want to hand write the address on all of the RSVP envelopes, and I wasn't feeling a label or printing, so I went with one of her handmade stamps. I think it is certainly worth the money because we can use it not only for the wedding, but any time in the future as well. It's great quality and was super fun to use on all the envelopes :)

Some of you may also remember my Moo Card teaser a while back. I decided to use Mini Moo Cards for our wedding website, and I really think it fit nicely with our invitation package - especially the cards with Mr. C's red sweater - he just matches perfectly :) We used a mix of six different photos, because I couldn't choose just one, and each guest got a fun little picture of us with the website info.


So, now you're probably all tired of looking at photos of our invitations :) But, tell me about yours! Did anyone else start getting RSVP responses back? It just makes everything seem so real!

Monday, September 3, 2012

Table Numbers: (Finally) A Success!

Hive, I love you guys. And because I love y'all, I'm going to share the entire process of making our table numbers. Instead of just saying, Hey look at this super cute project I did and how great it turned out, you guys are going to get the good, bad AND the ugly. Maybe that's more of a punishment than a treat, but either way, I'm sharing it all!

The table number process started a few weeks ago when I shared my inspiration with y'all and asked for your suggestions. A lot of you liked the blinged out numbers with rhinestones, as did I, so I was on the lookout for something super sparkly I could DIY. About a week ago, Style Me Pretty posted this super cute birthday party, complete with lots of sparkle. One of the images was this glittery gold number four, and it was exactly what I had been looking for/didn't even know I was looking for until I found it!

Image via Style Me Pretty
After a quick Google search, I found that these numbers could easily be attached to wood bases, allowing them to stand up and serve as the perfect table number, so I set off to gather my supplies and make my own. I started with wood numbers and bases, Glitter Blast Glitter Spray (which I had read could work wonders), clear sealer, and my trusted glue gun.


I chose Diamond Dust for the glitter color, hoping for a nice sparkle and shine that would accent our 
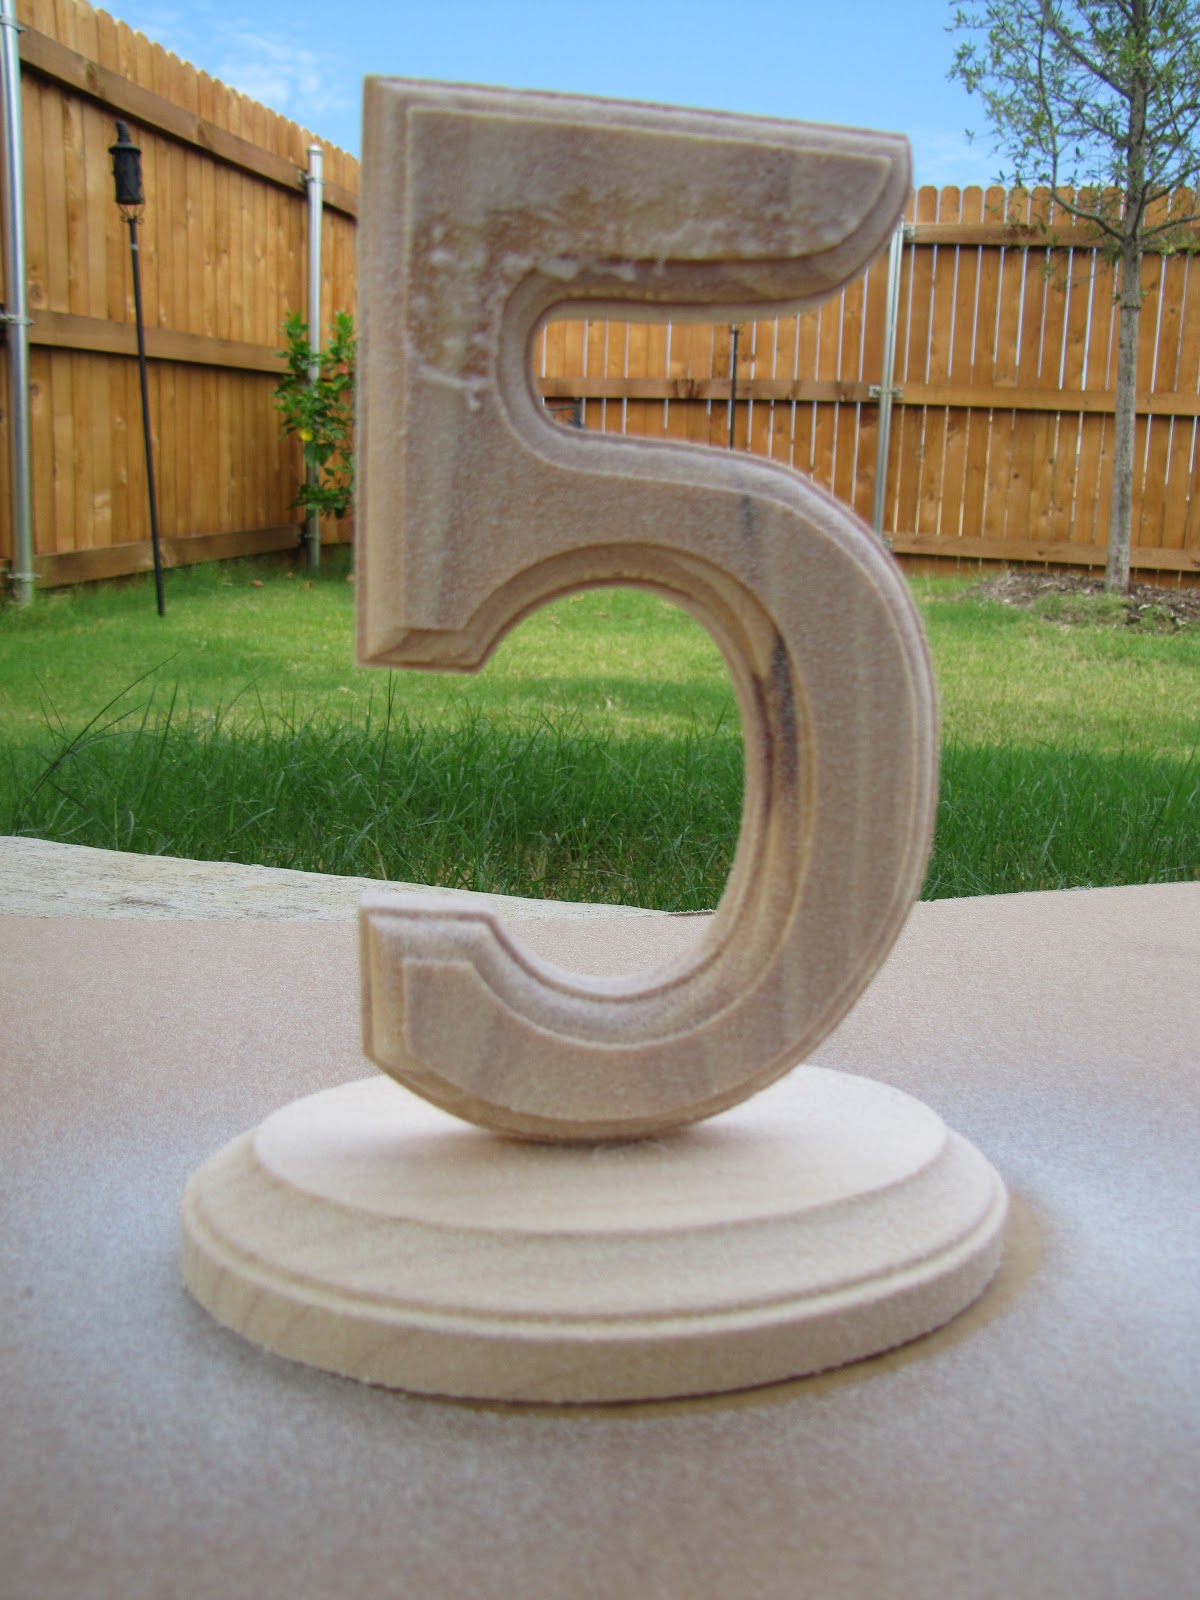
white wedding centerpieces but unfortunately this is not the result I got. After attaching the numbers to the bases with my hot glue gun, I took them outside to start painting.


The result was terrible. Not only was the coverage very, very minimal, but I found out how finicky the paint was about bubbling and dripping if you don't move fast enough aren't a very good spray painter. After doing a little more research, I realized I had picked the one color of Glitter Blast that was meant to be more of a top layer, and had no color of it's own. Perfect. So I pulled out a can of white spray paint I already had to create a base, and then try the glitter on top of it. The result was much better...


A little texture, but not much sparkle - I should've taken the "dust" part more seriously..
..but it just wasn't enough glitter for me. Honesty, looking back at the pictures it was hard for me to tell which was just the white base coat, and which had glitter. I was really pretty disappointed. I didn't want to do red glitter numbers - too "Dorothy's slippers" for me - and the white wasn't working, so I wasn't sure where to go next.

I headed back to the craft store to check out the other options they had, and the silver option caught my eye. Our ballroom will have silver and gold Chiavari chairs, and I'm leaning toward silver chargers for the table, so the silver numbers could definitely work! I purchased a silver base coat (just to be safe) and  the silver glitter and headed home for round two.

I tried out the new stuff on the messed up '5' just to be safe, and ohmygosh you guys - the result was so much better. The silver coat by itself had so much coverage, and the glitter on top of it looked fantastic. It even hides the flaws from the previous coats really well.

Round two!
Left: silver base coat, Right: base coat+glitter 
I let them dry for a day or so (while repeatedly going outside to check them out in different light) and then sprayed on the clear sealant to hopefully avoid glitter all over our guests' carefully chosen dinner.

Look at that glitter!


The store was out of a few numbers, so I had to special order them and will continue to paint them as they come in. I ordered another '5' just to be safe! I really think when these are paired with the entire table set-up they are going to pop in the best of ways. I'm considering even adding another coat of the glitter spray if I have enough at the end.

Okay, guys - what do you think!?